

Saturday, October 31, 2015
R2G Card Kits - SU - Wonderful Wreath
R2G Card Kits - SU - Believe

R2G Card Kits - SU - Jumbo Snowflake

I started with Winter Frost Designer Paper. I cut it to 4.25 x 3.25 inches and adhered it to the bottom of the Smoke Slate portrait card. I placed the greeting combo from An Eventful Year and Remember December in Basic Grey in the top left hand corner. I cut a strip of Pool Party 4.25 inches wide and glued that at the top of the designer paper just overlapping a smidge. I punched a snowflake from Whisper White with the Jumbo Snowflake Punch and adhered it on the blue strip on the right hand side.
Thursday, October 29, 2015
Be Present for Christmas - Lesson 4 - When All the Miracles Begin

Our activity for the next 2 weeks is creating an Advent Calendar. I found a wide variety during my on-line research. I chose a garland type calendar with a scripture reading for every day.
I cut the envelopes with the Stampin Up Petal Card Bigz die. For this calendar, I chose navy card stock. The bottom three petals of the envelope were adhered together with quick dry adhesive leaving the top petal to hang the envelope. A hole was added to the top petal and a piece of coordinating thread was pulled through and a knot was added to the end. Each envelope holds a small sheet with the day's scripture verse and also a small sheet is included to write down the day's activity. I found the set of scripture readings here (A Girl and Her Blog). I punched a SUcircle in gold and color printed the numbers to match the navy and burgundy colors I chose. Again, they were adhered to the other side of the envelope with quick dry adhesive. I ran a length of white grosgrain ribbon through the burgundy felt garland to add strength and interest. White buttons were sewn in the middle of the circle elements in the felt making sure that the ribbon was attached. The envelopes are then hung onto each button. This allows you to take down the envelope to the family, have your time of sharing and then return it to the garland. For children to track the progress the number can be turned to the back each day so they know which date in December is next.
This week the lesson focus is When all the Miracles Begin. It's the story of Elizabeth and Zechariah. We don't have to work for the coming of the Lord. He will prepare our hearts for His coming. You don't have to work for Christmas, you don't have to earn Christmas, you don't have to perform Christmas, you don't have to make Christmas. Just open your hear to the miracle.
I'm selecting my lessons from The Greatest Gift by Ann Voskamp.
The book provides 24 lessons for each day of Advent of which I have
chosen 7 for this class. We will have readings, questions, discussion,
and an activity each week.
Wednesday, October 28, 2015
Poinsettias - Watercolored

Christmas Ornament - Silver and Gold

 I started with the designer paper which had grey/silver and brown/gold ornaments. It was not metallic paper so there was no shine. I cut the full 12x12 sheet into 2 inch strips. I chose ivory and grey card stock for the cards. I cut the ornaments with the Sizzix Ornaments #4 die from silver and gold metallic card stock and then swapped the pieces to create full ornaments which were taped on together on the back. I placed the silver ones on the ivory card and the gold on the grey card. I adhered the stripe of designer paper on the left hand side. Adhered a half in card stock strip over the right hand edge. The ornament was then aligned on the right hand edge of the strip. I selected 2 snowflake sequins which I placed in the hanger of the ornament, it is held in place with a tiny gold star brad.
Christmas Stack Class - R2G Kits


Monday, October 26, 2015
Card Club - October - Polaroid Frame

Card Club - October - Curly Label Greeting

I did use scallop circles greetings as well in these card kits.
Card Club - October - Decorative Label with Accent

Card Club - October - Oval Tag

Mosaic Monday - Weekend Treasures

My niece was up for the weekend and there was a large rummage sale on so we hopped into the car and headed out. Wow! The prices were very good. These treasures are from several stops along the way this weekend which included the rummage sale, the re-use center and the thrift store. The souvenir spoon from Tahiti I'm hoping to turn into at necklace, I love the beautiful texture on the back of the bowl. The tiny wood books were just too cool to leave, they may end up on a canvas collage. The pen is heavy, of good quality and made in Germany by Elysee, my plan is to use it as prop in still life photography. The bud vase is vintage and absolutely gorgeous. I added the bit of rose colored seam binding I found along the way. It is photographed on the 2 navy blue placements I found which will work for my winter decor. The aroma therapy pendant is something I have looked at many times but they are very pricey, this one was not. I love the colors in the glass. Yellow striped potholder will fit into the kitchen perfectly.
I am submitting to Mosaic Monday hosted by Judith at Lavender Cottage.
I picked up this stained glass angel for song at the Rummage Sale. It is quite large and will join the other stained glass pieces in the living room window so I can see it every day with the sunlight streaming through it. I know it has a little crack but don't we all have our imperfections and that is okay.

Thursday, October 22, 2015
Be Present for Christmas - Lesson 3 - Come to the King
 With Lesson 3 it comes down to being one to help others.
I chose to make Blessing Bags for our Street Ministry team as our activity this week. I handed out a list of suggested items I had compiled from the internet and a zip lock bag last week. We will assemble our bags tonight and hand them over for giving. You can find the list in my Freebies tab. Soon homeless here will need warm clothes so I bought a scarf, gloves, a tuque and lip balm. For health I included cough drops and Advil. For hygiene I added a toothbrush, (I thought it was important to have a cover for the toothbrush so it stays clean), toothpaste, handi-wipes, shampoo and a microfiber washcloth with a ziplock bag to store it. Sweets are always nice. Notebooks & pencil just to write a note for someone cause they are not home. Or make a food list when you go to the food bank or notes when at the shelter. Kids came to mind when I saw the pencil crayons. I could think of so many things that I ended up with 2 bags.
 I wanted to include a note for the recipient and with a search on line I decided on this one.
I'm selecting my lessons from The Greatest Gift by Ann Voskamp. The book provides 24 lessons for each day of Advent of which I have chosen 7 for this class. We will have readings, questions, discussion, and an activity each week.
This week the lesson focus is Esther the queen who could act to save her people who live outside the gate of the palace in which she lives. It meant being brave to approach the King. Her uncle tells her "This is the moment you were made for: Use the life you have been given to give life to others."
If not you, then who? We have so much we are compelled to share it.
We made 12 Blessings Bags. It was so exciting and a lot of fun!!!
Tuesday, October 20, 2015
Sympathy - Simply Sketched - Winter Green

I started with a Stampin Up Sage Shadow card. I cut a piece of Winter Green DSP to leave a small border and adhered it to the card front. I stamped the bird and sympathy sentiment from the Simply Sketched stamp set in Always Artichoke onto Very Vanilla card stock. I heat embossed it with clear powder. I adhered in the bottom right hand corner.
Sympathy Cards - Family
 These are the cards I made for her sisters and niece. I continued with the same 4" squares of Stampin Up Elegant Soiree DSP. This time I used the other side of the paper onto Baja Breeze card stock. I chose the flower from the Simply Sketched stamp set for this card stamped in BB on VV card stock. I flagged the end of the strip with the Banner Triple punch.
 For this next card I used the bird in Basic Grey on VV card stock. Again flagged end of the sentiment layer. The multi colored side of the Elegant Soiree DSP.
They are a large and very close family so it will be a difficult day.
Sympathy Card - Simply Sketched with Elegant Soiree


I started with a sheet of double sided designer paper from Stampin Up Elegant Soiree collection. The colors in this paper are Very Vanilla, Baja Breeze, Soft Suede, and Basic Grey. I used the Simply Sketched stamp set with the sympathy option. This one is stamped in BG on VV then the bottom is flagged with the Triple Banner punch. I cut the sheet of 12x12 into 9 4x4 inch squares.

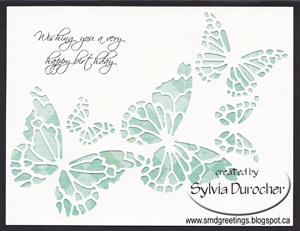
I made a set of five cards for her husband to use as he needs. I ripped the square at about two thirds and ripped again a small strip to remove the white edge. I cut the butterflies with the Sizzix Winged Beauties framelit set from VV card stock. I added wax paper between the die and card stock to assist the removal from the die. Works very well. The good variety of colors in the DSP allowed three different card colors which made it a quick card making session.
Monday, October 19, 2015
Butterfly Wishes
I bought this die a while ago and today I used it. I printed the greeting in the top left corner then cut the butterflies into the white card stock panel. I mounted a piece of designer paper behind it which was trimmed just a smidge smaller than the die cut. I mounted it onto a black card which coordinates with the greeting. This die allows a variety of color variations quickly and easily.

I was struggling with the layout in portrait but as soon as I turned it to landscape it worked better for me.
Mosaic Monday - Turquoise & Sunshine Yellow Dishes

I received a box that contained wonderfulness this weekend. It was wrapped and had a big white and glitter tulle bow. It was filled with beautiful blue dishes. They were all carefully wrapped to make sure they arrived safe and sound. It was a gift from niece for my birthday. We saw them at a second hand store in early September and I was interested in them but I could not decide on the moment so I left the store without them. She went back to the store a couple days later and bought them. They are so gorgeous!!!
The photos document the opening of the box as the blue emerges. I love the dishes. The lines are smooth, the color is spectacular, and the size is super as the mugs and bowls are generous! The middle right hand photo is one of the large blue plates on yellow charger plates. The yellow chargers are not quite sunshine yellow but they were $2 each so they came home with me. The bottom right hand corner photo is pairing sunshine yellow plates I purchased about 2 months ago because they were the right color. They pair up perfectly. Check out this post on my blue and yellow tablescape. Thank you to Carol C and Judith for inspiring me to have a beautifully set table.
Does anybody recognize these? Which company made them and when. They have no mark and I could find nothing about them on-line.
I am submitting this to
Mosaic Monday hosted by Judith at Lavender Cottage.
Saturday, October 17, 2015
Christmas Countdown Calendar

I'm in Millet again today. We were asked to donate an item for the family they are helping. I prepared this Christmas Countdown Calendar. With the envelopes being able to be moved around it can also be used as an Advent Calendar by starting with 1 for December 1st. I hope it brings blessing to a family in need.
Calendar details: The flocked ribbon with gold bead accent garland had a gold ribbon run through it in slits in the garland. The gold metallic ribbon is held in place when the buttons were sewn on with the stitching going through it. The envelopes were made with the Stampin Up Petal Card die, the numbers with the SU Scallop circle in gold and 1 3/8 circle with the number. A hole was added to the top flap into which a length of crochet cotton was placed. This is hung on the buttons.
Thursday, October 15, 2015
Be Present for Christmas - Lesson 2 - A Love Story
Today, we are making Christmas cards as the activity for our lesson to show love to those we care about.
 I needed a design for ladies who are not card makers and could be made in 30 minutes or so. I have stamped the Stampin Up Holy Family from the Gentle Peace polymer set onto vellum and embossed it. Half with silver powder and other half in gold powder. We will be making 4 cards - 2 of each design. I selected water color designer paper by Creative Imaginations - Sea Wash and Blue Wash. I paired them with coordinating card stock in green and blue. I have included an insert with the coordinating sentiment from the stamp set. The vellum is trimmed close and held in place with 3 brads, a star one for the top and to tiny ones for each bottom corner.
  This week the lesson focus is Life Begins with a Love Story. We were created by a huddle of holy hearts. Go to the window, the front door, the backyard, the park, the highest hill be awed by God's creation, you were made by love, for love and watch it come down.
I'm selecting my lessons from The Greatest Gift by Ann Voskamp.
The book provides 24 lessons for each day of Advent of which I have
chosen 7 for this class. We will have readings, questions, discussion,
and an activity each week.
It's time to start thinking of our Christmas Card List. As you can imagine I would highly recommend paper cards but I recognize that it may not be right for everyone. We want to show our love to others so it is better that they receive the love than it be handmade. Maybe it’s a family photo, a postcard, a digital card sent by email, or a newsletter. Other ideas?
Alphabet Photo Library

There are several options for displaying these words.

This is how I have chosen to display them at home. These no profile clear acrylic frames are from IKEA. Reasonably priced.

Check out my Alphabet Photo page for details.
Monday, October 12, 2015
Mosaic Monday - Leaf Canvas

I used Liquidtex Cadmium Yellow, Cadmium Red Medium, Titanium White, Phthalo Blue. I have applied a thin layer of Texture Paste with a palette knife.
Overall it was not too bad but I found the final piece a little flat. The maple leaf I had used for the printing was a deep dark color and was really gorgeous looking and I hated to throw it away. With the canvas looking flat I thought this is just what it needs. How to preserve it? A bit of checking and I painted both sides with Modge Podge. It needed a bit of strengthing so I using Modge Podge I adhered some deep burgundy mulberry paper to the back in strategic places. That will do nicely.
I cut letters from card stock painted with deep dark brown paint. I cut them with Stampin Up Little Letters framelits. I brushed them with some gold acrylic then adhered them to the canvas with quick dry adhesive.
Sharing as part of Mosaic Monday hosted by Judith at Lavender Cottage.
Thursday, October 8, 2015
Be Present for Christmas - Lesson 1 - The Small Shoot

Each week, they can include their prayer lists, the lesson plan, their Random Acts of Kindness, their family activities, and other relevant information.
I have cut a Stampin Up Top Note to be adhered to the front or the inside cover to identify the owner of the journal and the class. Some journals have stripes, some dots and some chevrons. Red, pink and grey.
I'm selecting my lessons from The Greatest Gift by Ann Voskamp. The book provides 24 lessons for each day of Advent of which I have chosen 7 for this class. We will have readings, questions, discussion, and an activity each week.
 The stump brings forth a small new shoot. From what appeared dead life emerged. It's not about the dead past but what we can create going forward. We must come as we are, ready to look at the smallest, find the shoot in the stump, find the broken in the cracks of the world and offer a word of love which will bring about miracles.
This pink one is my book for the class.
Be Present for Christmas - Gratitude

I am starting with Gratitude. I've read Ann Voskamp's 1000 Gifts from which I have taken a small excerpt about this very subject. Living with an attitude of gratitude changes us.
Monday, October 5, 2015
Paris Mixed Media Canvas

I am working with Gotrick Stretched Canvas 8"x8"and Liquitex Acrylic Paint. I taped the back with painters tape to keep it clean and provide a defined edge. I mixed this toned down pink with Winsor Newton Permanent Rose acrylic along with some white and black Liquitex. I painted the canvas with a large brush including the sides and left to dry over night. The next morning I applied Tim Holtz Textured Paste with a palette knife through a Heidi Swapp Stencil and just pressed some paste around the canvas with the knife. I left it to dry while I took my morning walk. I had planned on applying some elements by printing some Paris graphics reversed on freezer paper and transferring them to the canvas. This DID NOT work. You need a solid and hard surface to press onto and of course the canvas is not. Plan B. I diecut the Tim Holtz Eiffel Tower in chipboard and a black shadow layer. I applied 3 coats of Titanium White to the chipboard making sure I got the sides as well. I adhered the black shadow just offset a bit to the right. The white was pretty stark so I took a chance that my printing had not dried on the freezer paper. It printed pretty well onto the painted chipboard with using a brayer to apply even and consistent pressure. I cut the letters with the Cricut and the Storybook cartridge at 1.5 inches. Again white letters with black shadows to repeat what I did on the tower. The tower and the letters were adhered to the canvas with Quick Dry Adhesive. I have rubbed some of the edges and corners with a bit of black paint. I then spattered the canvas with some black paint using a old toothbrush and a butter knife. I'm happy with the way it turned out.
Submitting to Mosaic Monday hosted by Judith at Lavender Cottage.
Saturday, October 3, 2015
12 saturDays of Christmas - Millet

5104 50th Street 12:00 - 4:00 pm
Next to the Chinese Restaurant
If you are in the area or want a short road trip I hope to see you there!!
This sale is hosted by Do Something Magazine - an organization to empower youth. The fees we paid for tables will be donated to a needy family during the Christmas season.
Thursday, October 1, 2015
Christmas Card Challenge - Oct - Angel Vellum Stamping

Subscribe to:
Posts (Atom)