Thursday, November 30, 2017

Recent Photos

I have been asked for barns in winter so on my way to a craft sale out of town on the weekend I stopped and snapped a few shots.

It was late afternoon and the sun was catching the grass in the front and make it brighter.  The white on the barn was also brightened.


Of course most folks would prefer a red barn and as luck would have it there was one of those as well.

There is not much snow yet but  there will be opportunities later in the winter for more snow in the shot.


Breakfast was near the couch this morning.  I have a new to me teapot.  I decided a needed only one more teapot and it should work with the blue dinnerware.  At the second hand store yesterday there it was and on sale to boot!

I prepared Earl Grey tea in it this morning.  I brought breakfast out on a large oval golden yellow tray.  I am using a bowl and mug from the said blue dinnerware.  Works well.


I found the book at another second hand store the other day.

I have not found much information about the teapot.  The label on the bottom has Signature Housewares Inc. on it. I see that Costco carries this brand so that may be it's origin.  It is a 4 cup which a perfect size for 2 people.

This is a book I read recently.

This girl is fed up with her job and has a dream to live in Paris when someone poses the question. "How money would it take for you to quit your job?" What an idea.

She applies herself to the numbers, once the number is determined she goes about to achieve it.

She does get to Paris but I will not give you the whole story in case you want to read.  I believe it is a true story and the Paris Letters were a small way to raise funds to support her stay there.

I am sharing with

Share Your Cup #274 hosted by Jann at Daily Cup with Mrs. Olson

Friends Sharing Tea hosted by Bernideen

Tuesday Cuppa Tea hosted by Ruth at Antiques and Tea Cups.

Wednesday, November 29, 2017

CAVA Gallery - Fridge Calendars - French Quotes

I chose to make some of my Fridge Calendars with quotes in french.

This one translated says "Turn toward the sun and the shadow will be behind you."  It is a good message to keep moving forward.

I chose one of my wonderful sunflower photos to put behind the words.  The calendar comes from 2018 Printables.

I mounted the calendar on a deep golden yellow card stock.   Love it!


This one translated says "Life is made of small pleasures".  I chose a bright watercolor background for this one.

It is mounted onto Ultramarine Blue card stock. 


This one translated says "Flowers are everywhere if we take time to look for them".

I chose one of my pink cosmos photos for this one and arranged the words to leave the flower visible.  I

I chose a bright pink card stock for the backer.

CAVA Gallery - French Cards

I am dropping off cards to the gallery again today in preparation for the Miniature Show which starts on Friday, December 1st.

Here's a card that I used some of the pieces from the card club card but included alcohol ink background instead of designer paper. 

I chose an aqua card in 4.25x 11 with top fold which highlighted another color in the snowflake accent.

I added the same white grosgrain ribbon.

I adhered the greeting punched with the Stampin Up Modern Label punch. 

I chose a warm taupe card and added a bright magenta sky decorative paper.

I cut a large star from non shed gold glitter paper and placed it in the top half of the card. 

I cut the Bethlehem with the Taylored Expressions Bethlehem Border thin lit from the same gold glitter card stock.

I added a warm sand dune in the front with was created with Tim Holtz Antique Linen Distress Stain on white card stock which was ripped.  You can see that the ripped edge is a little darker because it absorbed better there.


Another card club kit into which I added some acrylic paint paper to which added some snow with pearl paint.  It was spattered with a old toothbrush rubbed on a straight edge. It was adhered to a deep red card base.

I ripped a white snow bank and adhered it even with the card bottom edge.

I added a deep red felt tree held in place with 3 tiny gold brads which look like ornaments.  A gold star sequin is placed at the top of the tree.
I chose a warm purple card base onto which I adhered a piece of bright purple paste paper.

I added a ripped snow bank of white card stock aligned to the bottom of the card.  

The silver foil reindeer was adhered above the snowbank with 3D foam tape.  It looks black due to scanning.

The greeting was color printed in Smoky Slate and punched with the Stampin Up Modern Label punch.  I punched one from the paste paper and offset it behind the greeting.  This was adhered to the card front with 3D foam tape.


I selected an aqua card base in 4.25x11 with a top fold.  I added a piece of alcohol ink background paper with blues and purples. 

I added a metallic silver ribbon across the top third of the card and tied a square knot. 

I created a snowflake accent with a deep blue, silver and silver fabric snowflakes layered and held together with a tiny shiny silver star brad.  It was adhered to the card front with 3D foam tape.

A french greeting was added in the top right hand corner in the form of a Stampin Up Modern Label Punchie.

Tuesday, November 28, 2017

Thank You Cards

I made thank you cards for the ladies who made it possible for me to have this opportunity to facilitate this card making session.

I started with a red foil flower cut with the same set as used in the large cards - Sizzix Flower #2 combo die and embossing folder. 

I mounted my flower onto a pea green card base.  I added the gold fabric snowflake in the center and held these in place with a tiny gold star brad. 

The greeting was color printed on vellum and embossed with gold powder.  The edges were ripped top and bottom and it is held in place with the same gold star brads. 


This card is using the more traditional colors of a deep green card base with the same red foil poinsettia flower.

The brads are mini brads in shiny gold.

Same thank you on vellum embossed with gold.

I chose the star for this one and cut it from non shed gold glitter card stock and embossed as in previous postings. 

It is held in place with a royal blue star sequin and a tiny gold star brad.

The greeting has only the top ripped and the bottom straight edge was aligned with the bottom of the card.  Gold embossed vellum.

I really appreciated this opportunity exposed some folks to card making and allow them time to spend time together keeping their hands busy.


Christmas Card - Embossed Primitive Star

This card features a classic color combination - blue and yellow. 

I used the Sizzix - Bigz Die and Embossing Folder - Primitive Star #2 for this card.  The star was cut from golden yellow card stock then embossed. 

I chose a designer paper by Creative Imaginations called Blue Wash on a navy card.  This is a large half sheet card.  The designer paper layer was cut to leave a nice border of the card color showing. 

I added navy blue star sequin held in place by a tiny navy star brad.  The star was adhered to the card front with 3D foam tape in the top half of the card to leave room for the greeting. 

The large banner greeting "Merry and Bright" has it's colors coordinated with the rest of the card.  The flag ends were cut with the Stampin Up Banner Triple punch on a 1.5 inch tall and 5.5 inch wide card stock greeting. 

Christmas Card - Red Velvet Poinsettia

I treated this flower die cut as a poinsettia.  This is the Sizzix - Bigz Die and Embossing Folder - Flower#2 combo.  The flower was cut from gorgeous red velvet paper from Recollections at Michaels then embossed.  I added a gold fabric snowflake in the center which is all held together with a mini brad in shiny gold.  I used a 1/16th inch punch to make adding the brad real easy.

I chose a white card to go with the white line in the designer paper by Bazzill Basic Paper - Holiday Style - Stitched Green.  It was cut 5 x 8 inches to leave a good border of the card color showing.

The large banner greeting was created with color printing the words in coordinating colors in the card.  It was trimmed to 1.5 inches tall the then both ends were flagged with the Stampin Up Banner Triple punch.  Works very well. It was adhered with double sided tape.

The poinsettia was adhered to the card front with 3D foam tape.

The insert was a half sheet with a coordinating sentiment.

Christmas Card - Embossed Ornament

The Sizzix - Bigz Die and Embossing Folder - Christmas - Ornament 5 is the focal element for this card.

I chose a warm pink card and coordinated it with designer paper by Basic Grey - Eskimo Kisses - Starry Night.   It was cut to leave a nice border of the card color showing.

I chose the light blue in the designer paper for the ornament.  It was cut and embossed.  I added a deep burgundy ribbon which was pulled through the ornament hanger and tied with pink crochet cotton.  I trimmed the ends at an angle.  It was adhered to the card front with 3D foam tape.

The banner greeting was created by color printing then trimming it to 1.5 inches tall.  The ends were flagged with the Stampin Up Banner Triple punch.  It was so easy to do a stack of these.  The greeting was designed for each card in the set.

I made 20 of each design so there was a lot of cutting and embossing done.

Christmas Card - Embossed Snowman

I am doing card making as an activity at a staff Christmas party tonight.  I designed some large cards which are half of an 8.5 x 11 piece of card stock.  I used a coordinated set of dies and embossing folders from Sizzix.  The elements are a great size for these large cards.

Here's the Sizzix Bigz Die with Bonus Textured Impressions - Snowman and Hat by Beth Reames.  I did not use the hat.  The snowman was cut from white card stock then embossed with the coordinating folder.

I chose a warm blue card and scored it down the middle. I added a piece of Mince Pie - Christmas Magic by Fancy Pants Designer paper which leaves a nice border of the card color.

I added a red thread scarf and a red round snap in the center of the snowflake on the lower ball of his body.   He was adhered to the top portion of the card with 3D foam tape.

I color printed the several greetings onto 5.5 x 8.5 inch piece of white card stock then cut them down to 1.5 inches tall and 5.5 inches wide.  Each was then placed in the Stampin Up Banner Triple Punch to put the flag on both ends.  It was adhered to the bottom of the card with double sided tape.

The banner punch does 1.00, 1.50, and 2.00 inches wide banners.  Works really well.

Monday, November 27, 2017

Card Club - November - Felt Tree

I started with the small white felt trees which were left over from this Christmas Card Club kit.

I added this swirly night sky designer paper onto a dark navy blue card base.

I ripped a snowbank which was adhered to the bottom of the card.

The tree is held in place with a tiny silver star brad.  The silver star sequin at the top of the tree is held in place with a silver tiny round brad.

The banner greeting was color printed and and trimmed close to the border.  It is adhered to the card front with 3D foam tape.

Here's the alternative color for this card kit.

It works beautifully as well.

Card Club - November - Star

I started with the large greeting which was left over from making this Nativity Christmas Stack kit.

I chose a card base which matched the color of the greeting.  I cut a piece of sparkly paper to leave a small border of the card showing and adhered it to the card front.

The greeting was tacked in place with a bit of tape near the bottom center then the 2 tiny black star brads were added in each of the top corners. Using a push pin to make holes through the card front push the brads through and spread the prongs apart on the inside of the card.

I cut the star with the Sizzix Stars#2 die from silver card stock.  It was adhered to the sparkly paper overlapping the greeting.


Card Club - November - Snowflake

The snowflake die cut was the starting point.  I managed to find some swirly designer paper which suggested a snow storm quite well.  That was cut to leave a small border of the true blue card showing.

The card base was cut 4.25 x 11 inches with the fold placed at the top.  This allows the white grosgrain ribbon to be easily wrapped around the card front and knotted to the front. The ends were trimmed.

The snowflake is adhered to the card front with 3D foam tape. 

The greeting is color printed and punched with the Stampin Up Modern Label punch and is adhered to the card front with 3D foam tape. 

Card Club - November - Kraft Tag

I started with the kraft and red glitter tag.  I added a red satin ribbon.

I chose a dark brown card base and added an embossed layer.  The white card stock layer was created with the Stampin Up Petals a Plenty folder and leaves a small border of the card showing.  The embossed layer is adhered to the card front.

The tag was adhered to the embossed layer then a tiny red brad was placed through a hole made with a push pin. The prongs were spread apart on the inside of the card.

I created the greeting by printing it on white card stock and punching them out with the SU Modern Label punch.  I added a red glitter label which was cut in half crosswise and adhered behind the greeting offset on the left and right.  The greeting is adhered to the card front with 3D foam tape.

Friday, November 24, 2017

Recent Happenings

I have been out of the joining on line parties for nearly a month. November is always craft sale month for me so it is a very busy time.  I made the time today even though there is still a to do list waiting.


We had a great Welcome to my Kitchen fellowship time last week.  A couple of ladies shared the responsibility where one hosted and the other provided snacks.  We had home made cinnamon buns, pistachio cool salad, a variety of cheeses and great crackers.

The tea was hot and plentiful.  We made at least 3 pots for 13 ladies in attendance.  We had a few coffee drinkers as well.

We had a wonderful time as we always to getting caught up and sharing about getting through tough times.

I met my sister half way between our homes recently to pass stuff to her and bring home stuff from her.  It cuts down on time and gas money and we were able to visit a few thrift stores while we are there.  I was glad that I had just had my all weather tires put on for the trip out of town.

One of the things that came to my house is my updated plate rack.  I had a near disaster with this wire rack about 2 months ago.  I really enjoyed having the plates vertical instead of horizontal so asked my handy brother in law if you could stabilize it with wood supports on either end. He applied tung oil to the surface before he assembled it was it was all done when I got it back. It looks fabulous and as you can tell it does the job wonderfully.  Thanks Brian!  I owe him lunch next time I see him.

I placed it on the freezer between the 2 cupboards so it breaks up the white surface without limiting the air circulation.

The kitchen is really coming together and with a new dishwasher it is staying tidy!!

It was not tidy for most of the day today.  Flour, butter, and savory and sweet elements went into 3 batches of baking for the fund raiser Bake Sale tomorrow.

I made variations on the tea biscuit recipe in the Puritan Cookbook.  The first was Buttermilk Biscuits, then Savory Cheese Biscuits (my favorite) and then a try at Cinnamon Pinwheels. I baked them in silicone cups in the muffin tin.  The dough was not what I thought it should be but with no experience they look like they turned out okay.

The biscuits were cut with a nice recent addition to the kitchen of a 2 inch scallop cookie cutter.  In my opinion it makes them the perfect size and pretty too.

I love that it has a handle and it was exactly what I had in mind when looking for a cookie cutter for my kitchen.  Maybe sugar cookies will be next.

Well I could not bake most of the day and give it all away.  As it was there were 18 pinwheels and I made sets of 4 for the bake sale so that leaves two!  Imagine that.

So I took time to have tea.  I made Oprah Chai Tea in my Maxwell & Williams Fusion Yellow tea pot with the built in infuser.  It is a nice deep pink color to go with pomegranate seeds on my plate.  A mandarin orange for vitamin C and a bit of old white cheddar cheese for a bit of protein.

I have recently added these beautiful blue and white oriental napkin holders to my blue and white dinnerware collection.

It was nice to sit down for a bit before I start on the next project tonight.
 
I bought this pomegranate to share with my niece during her visit last Saturday.  It was a quick visit and it did not make it to the table.

I am reminded though how we found a quick way to get the seeds out the shell.  You can check this post out for all the details.


I have read a couple of great books in the last month. The Tea Girl of Hummingbird Lane was excellent.  I had to wait to get it from the library but it was worth it.  I heard of the book through this book club hosted by Angela.  I hope I remember enough to offer a few comments on the book.


I got this book through our book exchange at Welcome to my Kitchen.  We bring books we have read and put them on a side table then others can browse the selection and bring a new book to them home to read.

I was not sure I would like this book but it was still on the table when the ladies left on November 16th so I thought why not!

It was a good ready with good history of Paris and when so and so lived, etc.  It is set just after the end of the Second World War. A young lady takes her life in her own hands and decides to pursue an art career in Paris. How bad can that be and of course as you can see from the cover this was a handsome man thrown into the mix for good measure.

I am sharing with the following:

Share Your Cup #273 hosted by Jann at Daily Cup with Mrs. Olson

Bernideen's Friends Sharing Tea

Anything Goes Pink Saturday hosted by Beverly

Tuesday Cuppa Tea hosted by Ruth

Thursday, November 23, 2017

Red Green & Gold Cards to the Gallery


I used my ink blot decorative paper in red, green and gold for this set of cards.  I cut the paper to leave a small border of the card color showing.

On this first one I added white and red silk flowers.  These are held in place with a gold brad and a gold flower sequin.


I used the paper again for these two cards.  I cut the stars with the Stars Framelits Dies Collection set  from Stampin Up. I chose to alternate the card and back star colors then added a gold glitter star over the card stock one.  The stars are held in place with a tiny red star brad. 


These were delivered to the gallery today.

Tuesday, November 21, 2017

Mini Show - Photos to Gallery

I'm dropping off my framed photos to the gallery today for the Miniatures Show which starts on December 1st. The art pieces must be 10 x 10 or smaller which provides customers the opportunity to purchase art at a smaller price point for the Christmas season.

I added my signature with a black Pigma Micro archival marker.

I chose this beech wood 10x10 inch frame with a white mat for my Wilson's Snipe photo which compliments the it nicely.

I chose a matte silver frame in 6 x 8 inches for this Barn Swallow photo.  He was keeping a keen eye on me when I visited the Ellis Blue Bird farm.  


A beautiful pink tulip taken at the Conservatory. I chose an 8x10 silver frame with a white mat.


This photo features a Greater Scaup which is a medium sized duck which was taken at Elk Island Park earlier this year.

I chose a 7x7 inch matte black metal frame with a generous white mat.  The black frame complements the black in the duck very nicely.


This red poppy is framed in a gun metal metal frame with a greenish granite mat.


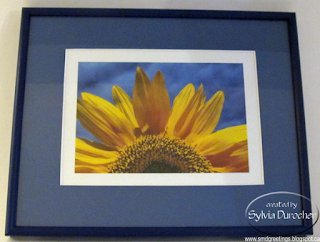
This sunflower was placed with a medium blue mat into a 8x10 inch matte navy metal frame.

The reception will take place on Friday, December 1st!


Sunday, November 19, 2017

Fridge Calendars - Tea - Quick & Handy

I decided to make a set in my line of fridge calendars that feature tea still lifes. 

I selected 4 tea sayings for these Fridge Calendars.  I selected photos which worked with the sayings.  The combo was printed on 4x6 photo paper which was layered onto coordinating card stock.  A magnet is then added to the back.  This allows it to be used on any metal surface - fridge, file cabinet, and/or toolbox.  A push pin will hold it onto a cork or bulletin board.

Put it where you can see it for a quick reference.  It is easily mailed so it is a great gift for those far away.  Include it in your Christmas card.

I chose the followiong tea related sayings.

There is always time for tea.
All you need is a book and a cup of tea.
Note to Self: Tea Helps
Tea is always a Good idea.


Monday, November 13, 2017

Small Calendar - Quick & Handy

I ran out of coasters for my Coaster Calendars so I had to invent one to keep a calendar in my product line with a smaller price point.  With so many photos from this year, that is where I went as a starting point.  I found a calendar at 2018 printable calendars.

I selected my best 5 sayings from my coaster calendars and included them in the Fridge Calendar.  I selected photos which worked with the sayings.  The combo was printed on 4x6 photo paper which was layered onto coordinating card stock.  A magnet is then added to the back.  This allows it to be used on any metal surface - fridge, file cabinet, and/or toolbox.  A push pin will hold it onto a cork or bulletin board.

I selected the following sayings.
Sisters are Forever
Life is too short to be anything but happy
Everyday is a second chance
Give Thanks Always
Count your Blessings

Put it where you can see it for a quick reference.  It is easily mailed so it is a great gift for those far away.  Include it in your Christmas card.


The Sisters calendar is a cosmos from the Legislature, the Happy one is a bright polished stone background, the Everyday is a sunset at Pigeon Lke to remind one that the light will return tomorrow, the Thanks is our river valley in fall, and Blessings is a flower bed at Legislature.  You can find them for sale on my Calendar page.